This is the second part of our DirectAdmin Tutorial Series. If you are planning a new VPS, then we recommend starting with part 1 and to not skip any parts.
Automated bots continuously scan IPs for vulnerabilities. To prevent this from causing problems on your VPS, setting up the security of your VPS is the first thing we do after the installation.
Most of these bots automatically check IP addresses until they get a hit on port 22 and then try to penetrate on your VPS as 'root' through Brute Force attacks. For this reason, SSH access for the root user is disabled on our VPSs with DirectAdmin by default. You can read here how to create a user for SSH.
Given the large number of IPs used by bots, we cannot include all attacking IPs in our own firewall, nor do we receive reports of the attempts to penetrate your VPS.
Security measures
We go through the following steps to secure your VPS:
- Changing your SSH port
- Restrict access to DirectAdmin to specific IPs
- Brute force protection in the form of Fail2Ban and a configuration adjustment in DirectAdmin
- Anti-virus/malware protection with ClamAV
- Optional: Restrict access on ‘Admin Level’ to specific IPs
- Perform the steps in this article as a sudo user (e.g. root).
- This is relatively complex matter. If you use the steps below to update an existing (instead of new) VPS, create a snapshot of your VPS first before you follow the steps below. That way you always have a snapshot to fall back on if it turns out that a change creates a problem.
- More in depth information about the CSF firewall can be found in DirectAdmin's documentation.
Change your SSH port
The root user does not have SSH access to your VPS by default. Additionally, we recommend changing your SSH port. This is a form of 'security through obscurity'; by changing your SSH port, you make your VPS invisible to most of the attacking bots (if not all bots). An additional advantage is that your log files remain organized and you get a clearer picture when your VPS is actually attacked directly, instead of randomly by a bot.
Step 1
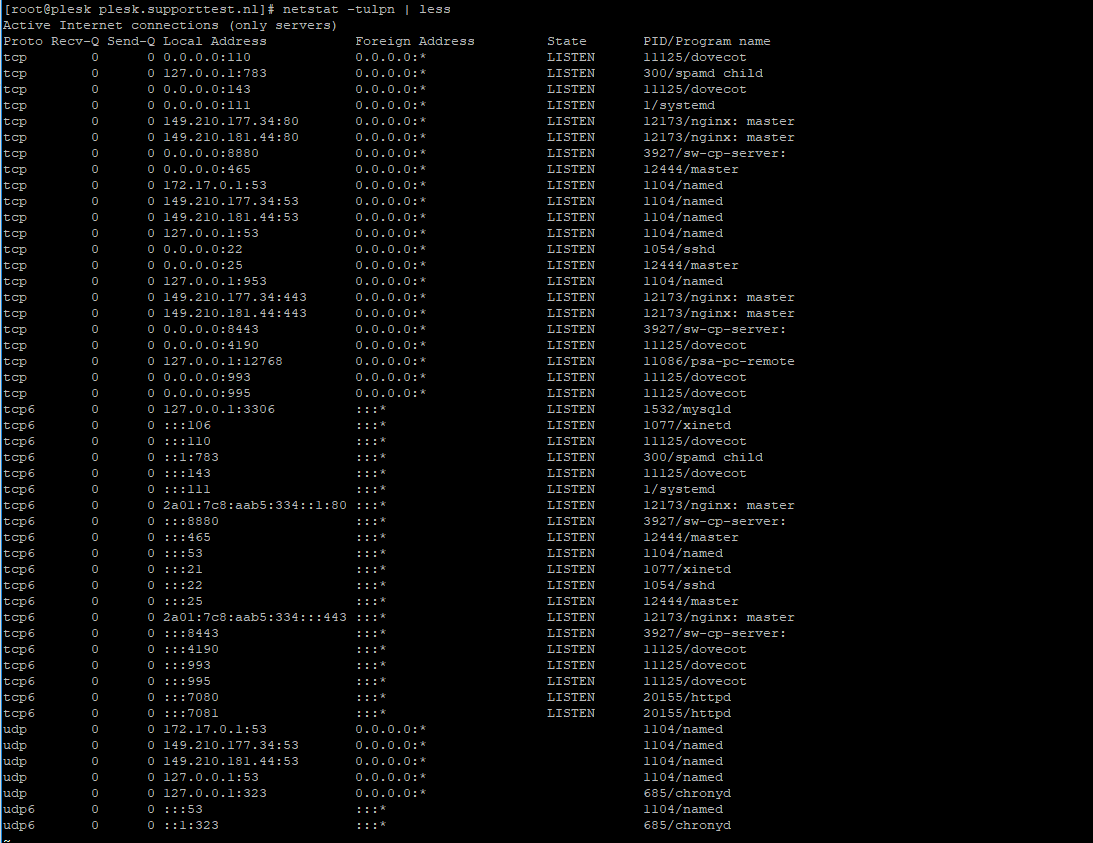
Connect to your VPS via the VPS console in your control panel or via SSH. Check your used ports with the command below.
netstat -tulpn | lessAn overview as shown in the screenshot below appears. In this overview, the port numbers are the numbers in the row 'Local Address' behind the colon.
Step 2
Choose a random port number between 0 and 65535 that is not shown in the overview (for example 47592) and press 'q' to stop netstat.
Step 3
Open the SSH configuration file with the command below. You can also use vim for this.
nano /etc/ssh/sshd_config
Step 4
The configuration file opens, and you will see the code below, among other things.
# If you want to change the port on a SELinux system, you have to tell
# SELinux about this change.
# semanage port -a -t ssh_port_t -p tcp
#PORTNUMBER
#
#Port 22
#AddressFamily any
#ListenAddress 0.0.0.0
#ListenAddress ::
Uncomment or delete the # in front of '#Port 22' and change the number to the number you chose under step 2, for example:
port 47592Save the file and close the file by pressing ctrl + x > y > enter in succession.
Step 5
Step 1
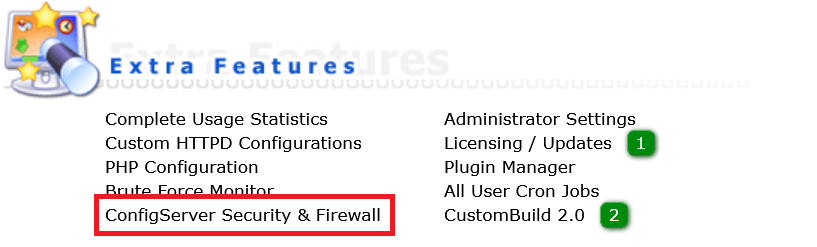
Log in to the DirectAdmin webinterface as the user 'admin' and click 'ConfigServer Security & Firewall'.
Step 2
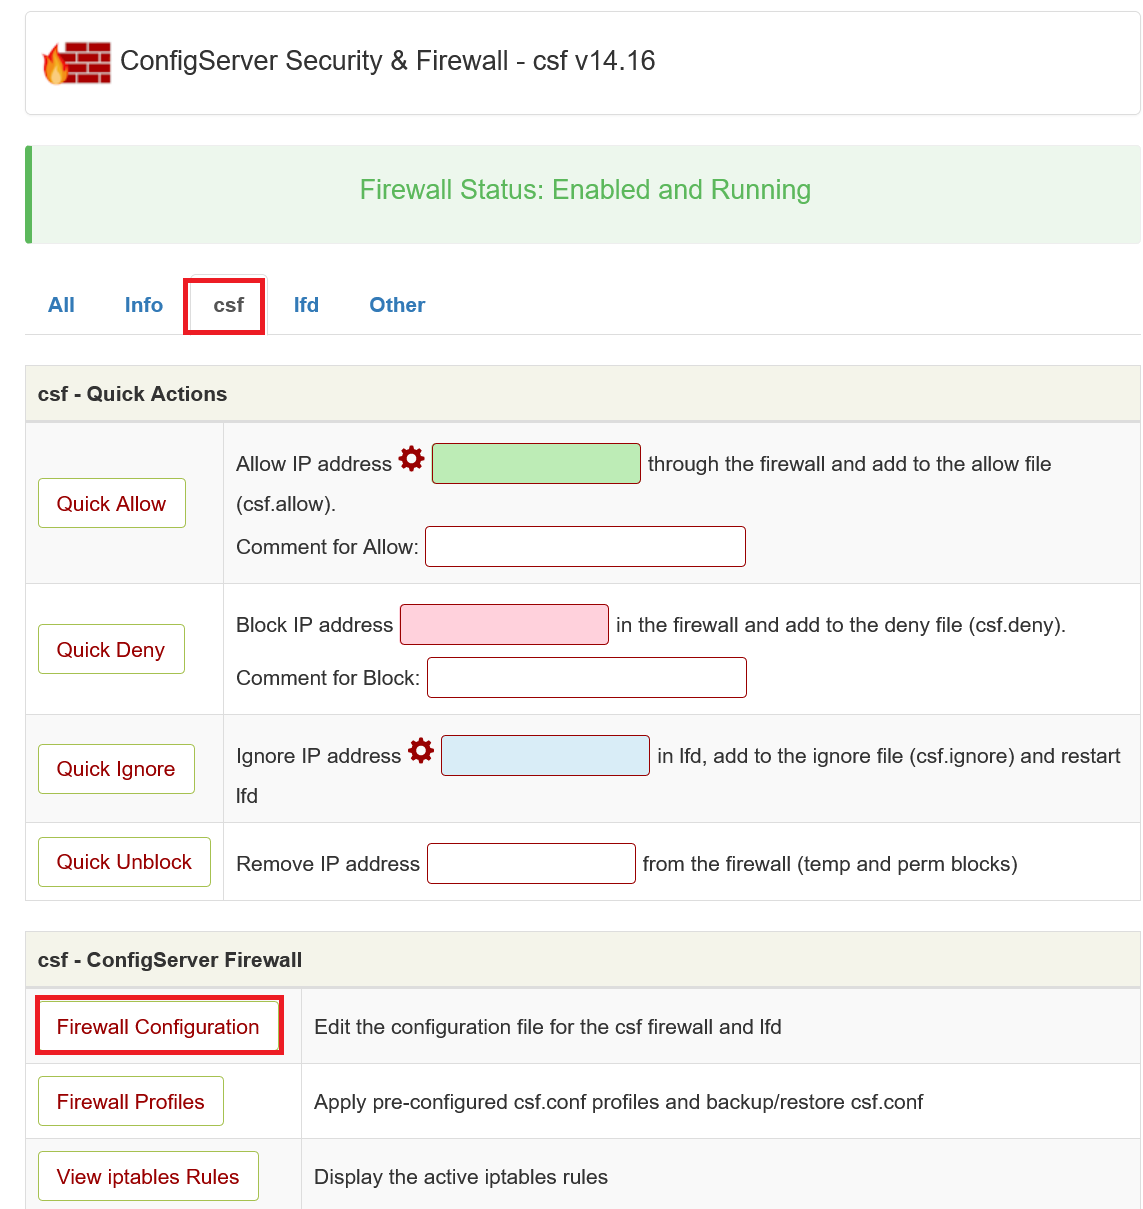
Click on 'CSF', or scroll down to 'csf - ConfigServer Firewall' and click on 'Firewall Configuration'.
Step 3
You're now shown a page with an enormous amount of options. Scroll down to 'TCP_IN' and change port 22 to the desired new port number, for example:

Scroll down a little further to 'TCP6_IN' and also change 22 to the new port number here. Afterwards, scroll to the end of the page and click 'Change'.
Step 4
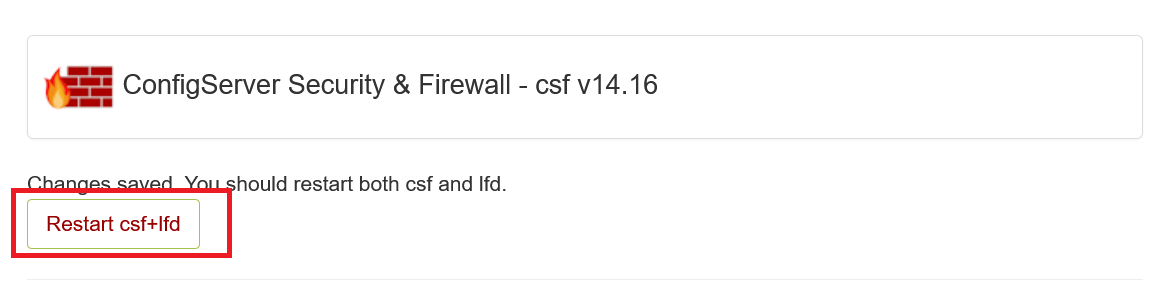
The changes won't take affect until the CSF-firewall and LFD (Login Failure Daemon) have been restarted. Click on 'Restart CSF+LFD' to restart both.
Do you use our VPS-firewall in the TransIP control panel? If so, don't forget to add a custom rule in the firewall in which you open your new SSH port, and to close port 22 there as well.
Are you connecting from a Mac or Linux computer to your VPS? Don't forget you should then specify the SSH port when connecting over SSH using -p <port number>, e.g.
ssh -p 47592 username@123.123.123.123Replace username with the name of the actual SSH user and 123.123.123.123 with your VPS' IP address.
Brute force protection
Bots try to enter automatically by performing brute force attacks on your VPS in different areas, such as SSH, Exim (outgoing mail server), and DirectAdmin. Fail2Ban, in particular, offers good protection against this.
Fail2ban
Fail2Ban protects your VPS by banning IPs that try to abuse your VPS, for example in too many wrong password attempts, searching for exploits, etc. We therefore recommend Fail2Ban wholeheartedly.
We discuss the installation and configuration of Fail2Ban in our Fail2Ban manual.
Please note: DirectAdmin will continue reporting "brute force attacks" under 'Message System', but these will be captured with Fail2Ban.
DirectAdmin
In DirectAdmin, you can set the IP to be blocked in the event of several incorrect log-in attempts. This step is optional and has no added value if you restrict DirectAdmin access to specific IPs (see 'Allow DirectAdmin access for specific IPs only').
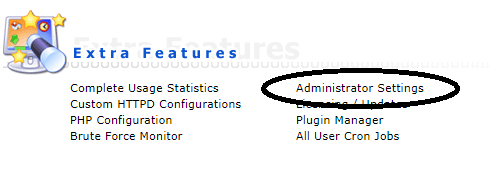
Step 1
Log in to DirectAdmin as the 'admin' user and click 'Administrator Settings' under 'Extra features'.
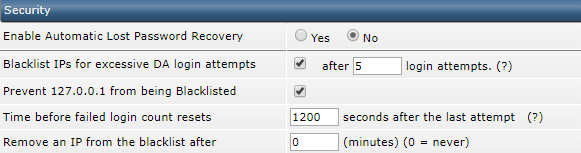
Step 2
Under 'security', check the options 'Blacklist IPs for excessive DA login attempts' and 'Prevent 127.0.0.1 from being Blacklisted'. You can also adjust the number of permitted attempts here at your own discretion.
Step 3
Sroll down and save the changes by clicking 'Save' at the bottom right.
Step 4
Please note! Whitelist yourself so that you are not accidentally banned if you do not have your password. Connect to your VPS via SSH or the VPS console and enter the following command:
echo "123.123.123.123" >> /usr/local/directadmin/data/admin/ip_whitelist
Replace 123.123.123.123 with your own IP.
Only allow DirectAdmin access for specific IPs
Port 2222 is the port you connect to in order to log in to DirectAdmin. In your firewall, you can choose to allow only specific IPs to connect to port 2222.
As of May 11th 2022 our VPSs with DirectAdmin use 'CSF' as default firewall. Older installation use 'firewalld' instead.
Step 1
Log in to the DirectAdmin webinterface as the user 'admin' and click on 'ConfigServer Security & Firewall'.
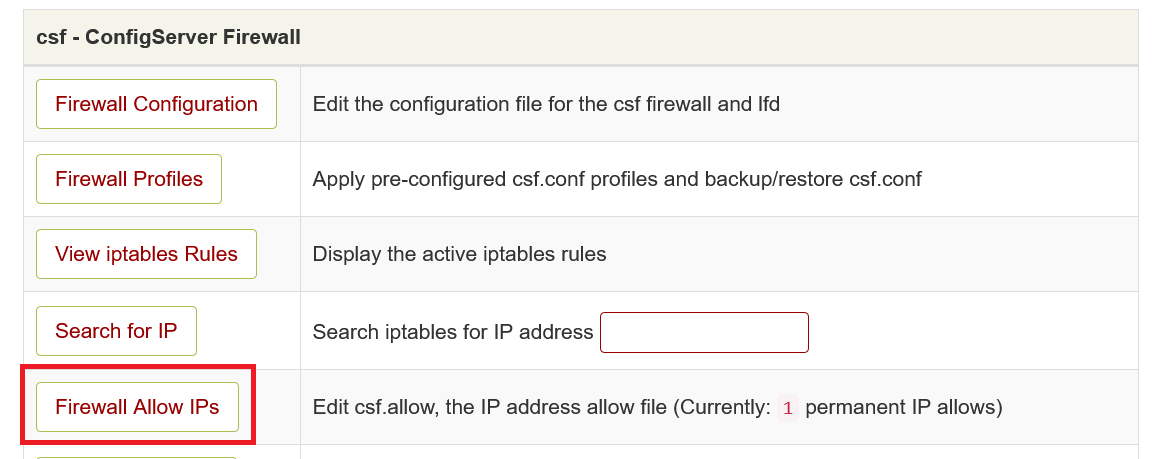
Step 2
Click on 'CSF', or scroll down to 'csf - ConfigServer Firewall' and click on 'Firewall Allow IP's'.
Step 3
At the bottom in the overview add the rule tcp|in|d=2222|s=123.123.123.123 where you replace 123.123.123.123 with the public IP address of your internet connection (can be checked here) and click on 'Change'.
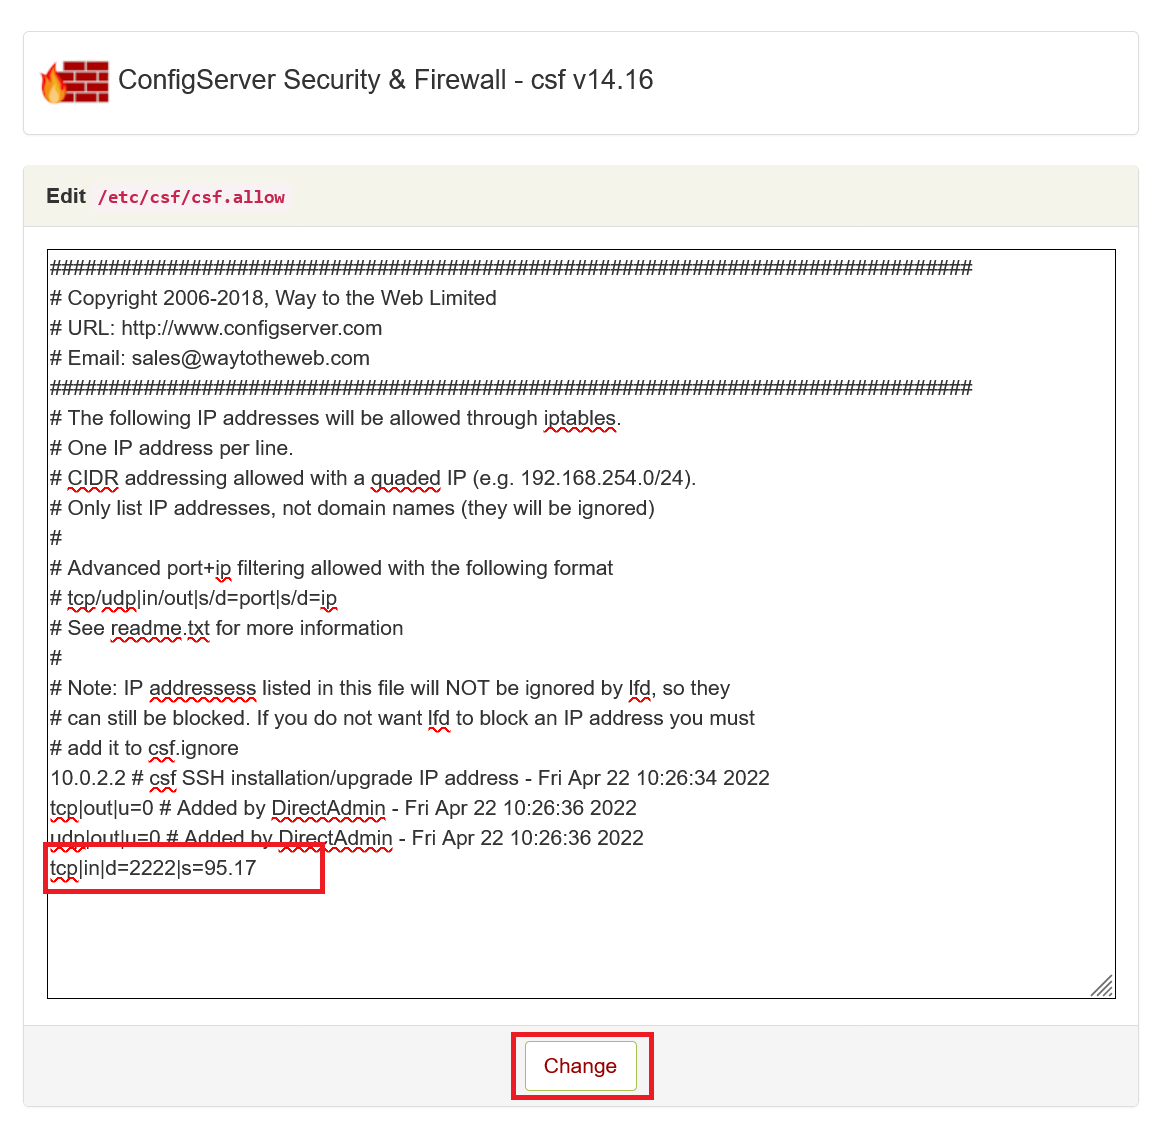
Please note: if you're using a VPN, it can be configured to not show its IP address on various 'what's my ip' websites. In that case, open your VPN client, it will usually display your public IP address.
Step 4
The changes don't take affect until after restarting the CSF firewall and LFD (Login Failure Daemon). Click on 'Restart CSF+LFD' to restart both.
Step 5
Click on 'CSF', or scroll down to 'csf - ConfigServer Firewall' and click on 'Firewall Configuration'.
Step 6
You're now shown a page with an enormous amount of options. Scroll down to 'TCP_IN' and remove port 2222:

Afterwards, scroll down to 'TCP6_IN' and also remove port 2222 here. Finally, scroll to the end of the page and click 'Change'.
Step 7
The changes won't take affect this time either until a restart of the CSF firewall and LFD. Click on 'Restart CSF+LFD' to restart both.
To round things up, cick on 'Return' at the bottom.
Anti-virus/malware protection with ClamAV
ClamAV is a free, open-source anti-virus program for, amongst other things, the detection of trojans, viruses, and malware on your VPS.
In our ClamAV manual for CentOS 7, 8 and AlmaLinux 8, we show you how to install ClamAV, ensure that ClamAV starts automatically and your VPS scans daily.
Optional: IP restriction for DirectAdmin Administrator Level commands
In a previous step, we explained how you only allow specific IPs to connect to DirectAdmin.
The number of people who connect to DirectAdmin at the administrator level is usually even more limited. In larger organizations, you often have several people with access at reseller and/or user level, but only one or a few DirectAdmin administrators.
By only allowing the administrators' IP to actually execute commands as the administrator in DirectAdmin, you prevent someone else from executing administrator commands if, for example, your password would leak and become known to someone with a user account.
Step 1
Connect to your VPS via the VPS console in your control panel or via SSH. Open / create /usr/local/directadmin/scripts/custom/all_pre.sh with the command:
nano /usr/local/directadmin/scripts/custom/all_pre.sh
Step 2
Add the code below to this file.
#!/bin/sh
USERTYPE=`grep usertype= /usr/local/directadmin/data/users/${username}/user.conf | cut -d= -f2

if [ "${USERTYPE}" = "admin" ]; then
if [ "$caller_ip" = "1.2.3.4" ]; then
exit 0;
fi

#repeat the check on the IP as many times as desired.

echo "IP $caller_ip is not allowed to be logged in as an Admin";
exit 1;
fi

exit 0;
Change 1.2.3.4 to the actual IP address that you want to allow. Optionally, you allow multiple IPs by adding the part below directly above '#repeat the check on the IP as many times as desired.' And adjusting 1.2.3.4 to the desired IP.
if [ "$caller_ip" = "1.2.3.4" ]; then

exit 0;

fi
Step 3
Finally, adjust the rights of the file, otherwise, DirectAdmin does not have the necessary rights to use all_pre.sh and you get an 'Access Denied' error message.
chmod 700 /usr/local/directadmin/scripts/custom/all_pre.sh
Using the above steps, you have set up solid security for your VPS. Click here to continue to Part 3: Updating your VPS.
Should you have any questions left regarding this article, do not hesitate to contact our support department. You can reach them via the ‘Contact Us’ button at the bottom of this page.
If you want to discuss this article with other users, please leave a message under 'Comments'.
