


In this article, we explain how to set an SRV record within the DNS settings of your domain name.
An SRV record is used to define the location of servers or certain services. For example, the SRV record can be used to link a domain name to a Teamspeak or Minecraft server.
However, the most used application of an SRV record is to link Microsoft's Office365 to your domain name. Because of this we'll explain how to set the SRV records for Office365. Check the article 'How do I add my domain to Office 365?' for detailed information about setting up Office365 on your domain name.
Where do I add an SRV record?
You can add all your DNS records easily and free of charge via your control panel. Go to 'Domain' in the menu and select the domain in the left column for which you want to set the SRV record (don't check the box).
Now scroll to 'Advanced Domain Settings', followed by 'DNS'. If you do not see this yet, first click the switch behind 'TransIP settings' so the TransIP settings are switched off. The DNS records of your domain name will become visible, after which you can change them at will.

How do I set an SRV record?
An SRV record is made up of several different parts. Make sure to stick to the correct order when setting up and SRV record. The correct order is as follows:
- Service
- Protocol
- Priority
- Weight (here you can indicate which record must be used first when using SRV records with the same priority)
- Port
- Target
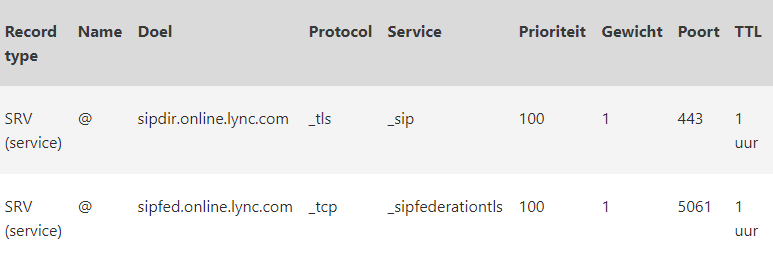
You can see which parts belong to the SRV records of Office365 in the image below.
We will now show you how to combine these elements into the two required SRV records for Office365.
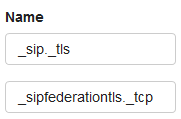
Name
In the 'Name' of an SRV record, first the service is entered, followed by the protocol. In the image above you can find the service and protocol of the two SRV records for Office365.
The first SRV record contains the service '_sip' and the protocol '_tls'.
The second SRV record contains the service '_sipfederationtls' and the protocol '_tcp'.
In the example below, you'll see how you enter the service and the protocol in the 'Name' field of a DNS record in your control panel.
TTL
The 'TTL' of a DNS record determines how long the record can remain in the cache. We recommend keeping the TTL low, for example at 5 minutes or 1 hour.
Type
Because we're setting an SRV record, we choose 'SRV' under 'Type'.
Value
You provide the priority, the weight, the port and the target consecutively in the 'Value' field of a DNS record.
In the value of the first SRV record named _sip._tls you use the following components:
- Priority: 100
- Weight: 1
- Port: 443
- Target: sipdir.online.lync.com.
In the value of the second SRV record named _sipfederationtls._tcp you use the following components:
- Priority: 100
- Weight: 1
- Port: 5061
- Target: sipfed.online.lync.com.
Please note the final dot of the 'Target' of both SRV records. This is required for the record to function properly.
End result
The complete SRV records will look like this:
You should now be able to add different types of SRV records as well, using the steps provided by this article. Most services that require you to add SRV records will supply you with the service, protocol, priority, weight, port and target.
More information on SRV records and its syntax can be found in RFC 2782 as described by the IETF.
Keep in mind that it can take up to 24 hours before changes to DNS settings to be implemented globally. This is related to the way external systems process these changes. You usually see these changes well within 24 hours.
In this article we explained how to add SRV records within your DNS settings. Specifically, the SRV records for Office365 have been used as an example.
To use Office365, additional steps and DNS records are required. Read the article 'How do I add my domain to Office 365?' to see how you can fully associate your domain with Office365.