


Attention: Starting January 2026, Gmail will no longer provide support for Gmailify and POP for third party email accounts. This means you will not be able to use your TransIP e-mailaccount in Gmail for desktop.
You will still be able to use your email address via the Gmail app for Android.
This article explains how to configure your email address at TransIP in Gmail, assuming:
- You already own a Gmail address.
- You've created a new email address at TransIP, using either a web hosting package or Email Only service.
- You want to manage your email address at TransIP using Gmail.
To use email with our Web Hosting and Email Only services, your domain name needs to use the correct DNS records.
If your domain name uses the TransIP settings, we will automatically take care of the DNS for you. If you rather want to configure the DNS yourself, make sure to add the MX, TXT and CNAME records for your Web Hosting or Email Only service.
- The article 'The DNS settings of my Web Hosting' shows you which DNS records you need to add.
- The article 'Entering DNS records and nameservers via the control panel' shows you how to add these DNS records.
Configuring your email in Gmail
Step 1
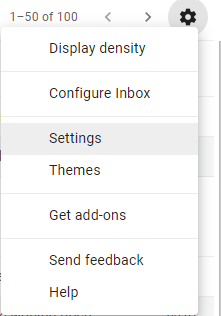
Open Gmail in your browser. Click the cog wheel in the top right corner, followed by 'Settings'.
Step 2
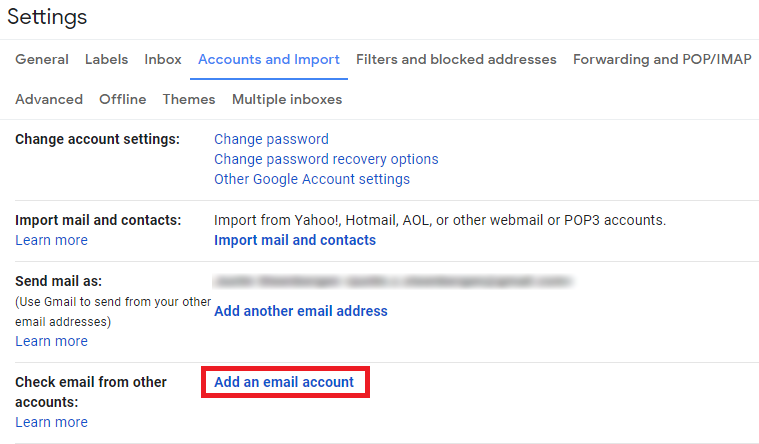
Visit the tab 'Accounts and Import'. Next to 'Check email from other accounts:', click on 'Add an email account'.
Step 3
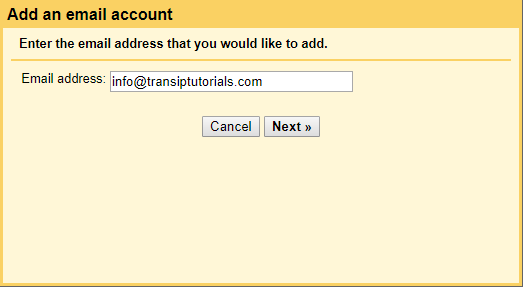
A prompt will open, asking you to add an email account. Enter the email address you wish to configure in Gmail. In our example we use the email address info@transiptutorials.com.
Click 'Next' to continue.
Step 4
In the next window you will see two options. Using Gmailify is greyed out, since we do not support this feature. Because of this, you need to configure the email address yourself.
Click 'Next' to continue.
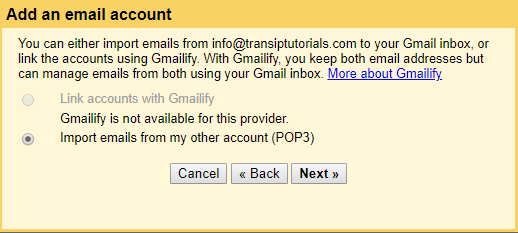
Unfortunately, Gmail doesn't support IMAP, which is why you can only choose to set up your email account with POP3. Read the article 'The difference between IMAP and POP3' for more information.
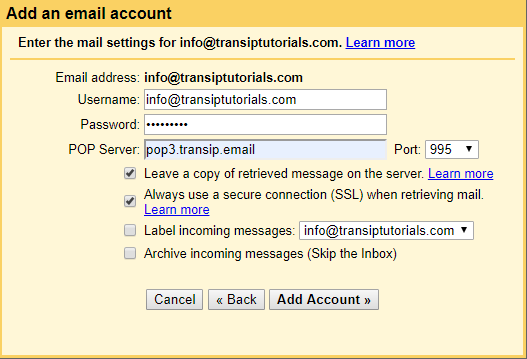
Step 5
In the next window you will need to enter the email settings of your email address. Use the information below to fill out the forms.
- Username: Enter your email address
- Password: Enter the password for your email address
- POP Server: Enter pop3.transip.email
- Port: 995
- We recommend checking the box next to 'Leave a copy of retrieved message on the server' if you want to use your email address in other clients as well (such as Outlook or our webmail client). If you only want to use your email address in Gmail, you can leave this box unchecked.-
- Check the box next to 'Always use a secure connection (SSL) when retrieving mail'.
- The last two boxes are optional. If you wish to view your email address in a separate window in Gmail, we recommend checking the box next to 'Archive incoming messages (Skip the inbox)'.
- Use the steps in 'Viewing your email address in a separate window' for more information on this feature.
Can't remember your password? Use the steps in the article 'Changing the password of your email address' to set a new one.
When you're ready, click 'Add account'.
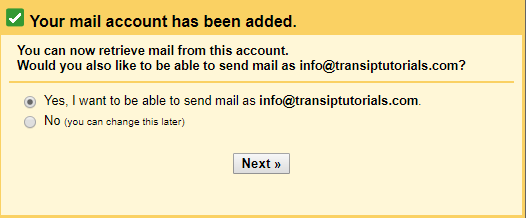
Step 6
Choose 'Yes' if you want to be able to send emails with your email address in Gmail.
If you choose 'No', you will only be able to read emails, not send them. Take note that you can change your preferences in the tab 'Settings' > 'Accounts and Import once the configuration is complete.
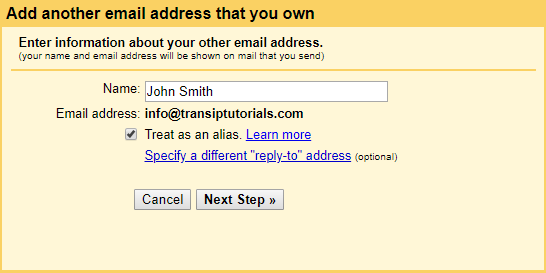
Step 7
Enter the name you wish to send emails with. We recommend checking the box next to 'Treat as an alias'. Read this article by Google for more information on this feature.
Click 'Next step' to continue.
Step 8
If you chose not to use your email address for sending emails, then your work is done! Your email address will now be configured.
Take note that you will not be able to send mails, unless you change your preferences in 'Settings' > 'Accounts and Import'. If you decide to change your preferences, use the information in this step to do so.
If you chose to send emails with your email address in Gmail, you will need to enter the information below.
- SMTP server: Enter smtp.transip.email
- Port: 465
- Username: Enter your email address
- Password: Enter the password for your email address
- Check the box next to 'Secured connection, using SSL'.
When you're ready, click 'Add account'.
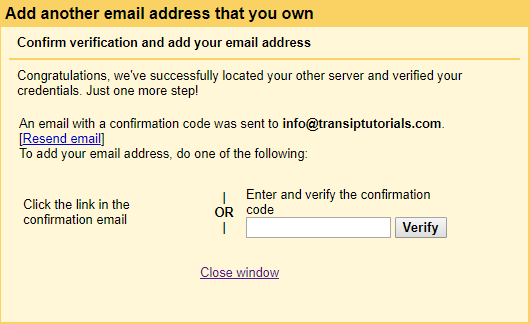
Step 9
For the final step, Gmail asks you to verify your email address. An email will be sent to the email address you've configured.
Now open the inbox of your email address at TransIP with the TransIP webmail or another email client. Log in with your email address and password and look for the email from Gmail.
Either click the link in the email from Gmail or enter the verification code in the window as shown below and click 'Verify'.
Once you've clicked the link or entered the verification code, your TransIP email address will be succesfully configured in Gmail. You can now use Gmail to both send and receive emails on your email address at TransIP.
Viewing your email address in a separate window
If you've configured your email address without checking the box 'Archive incoming messages (Skip the inbox)' in step 5 in 'Configuring your email in Gmail', the emails sent to your email address will be shown in your Gmail inbox.
If you've checked the box 'Archive incoming messages (Skip the inbox)' in step 5, you can configure Gmail to show the emails for your email address in a separate window.
If you haven't already, you can enable 'Archive incoming messages (Skip the inbox)' via the 'Settings' > 'Accounts and Import' menu.
In here, search for your email address next to 'Check email from other accounts' and click 'edit info'.

The window from Step 5 will be shown again. Check the box next to 'Archive incoming messages (Skip the inbox)' and enter your password again. Click 'Save changes' to continue.
Step 1
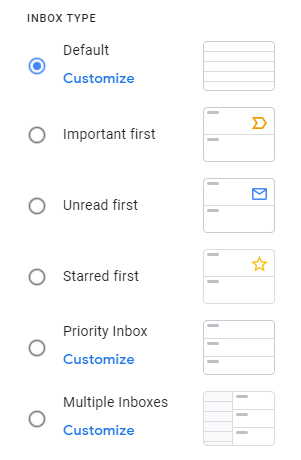
Click the cog wheel in the top right corner and scroll down to 'Inbox Type'.
Step 2
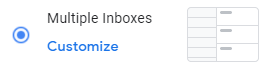
Click on 'Multiple Inboxes' and then click on the link 'Customize'.
Step 3
Make sure the 'Inbox Type' is set to 'Multiple inboxes'.
Below this option you see a list of Sections for which you can enter search queries and add Section names. For each Section entered here, an extra window will be added to your Gmail inbox.
Some Sections may already be filled out. You can freely delete these Sections if you do not want them, your Gmail inbox will always be present.
Next to a Section, enter a search query that starts with to: followed by your email address. Enter a name for your extra inbox below 'Section name (optional)'. See the image below for an example.
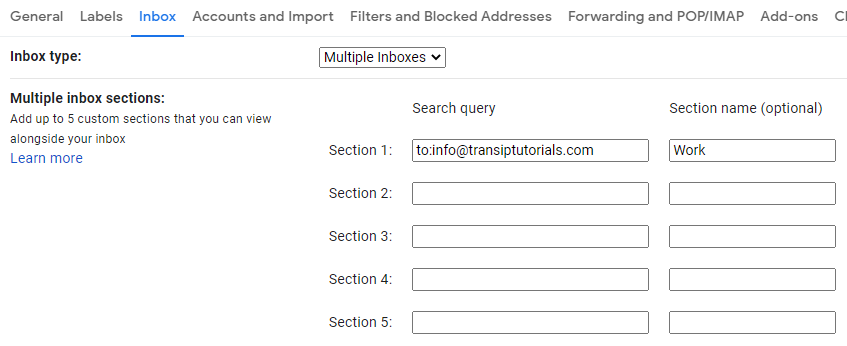
Select where you want the inbox to be shown next to 'Multiple inbox position'.

Finally, click 'Save Changes' at the very bottom of the page.
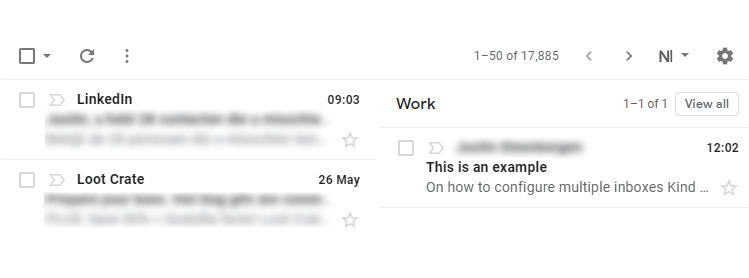
You will now be brought back to your inbox. Depending on the positioning chosen in Step 3, you will now see your other email address displayed in a separate window.
In this article we explained how to configure your email address at TransIP in Gmail.